Friday, July 27, 2012

The Daring Bakers go Crackers!


A very short and sweet post this month, but I am supposed to start packing for the plane that leaves in 12 hours to take me home. I am/was away in gorgeous Halifax, so I only got one cracker made instead of 2, but it was delicious. I made a twice baked whole wheat cracker with figs, pecans, rosemary and pumpkin seeds. I sort of followed this link, but used different fruit and flour. That's what I call following a recipe. They were delicious with blue cheese and I'll be making more as soon as it's cool enough to turn the oven on again.
The colourful buildings of Lunenburg, Nova Scotia
Thanks Dana for a great challenge!
Blog-checking lines: Our July 2012 Daring Bakers’ Host was Dana McFarland and she challenged us to make homemade crackers! Dana showed us some techniques for making crackers and encouraged to use our creativity to make each cracker our own by using ingredients we love.

Wednesday, June 27, 2012

Battenberg Cake for the Jubilee!


This month's Daring Baker challenge was a lot of fun. We made the kind of cake you imagined eating as a little girl at a tea party with your stuffed animals and tea set. It is a very British cake, fitting for one made during the Queen's Jubilee celebrations. Here in Canada, there was plenty of coverage of the Jubilee but we didn't talk about it in school. However in the small town where my mother and brother live, I found a small Jubilee flag in the school playground. It seems that all the kids were given them. I wonder if they all watched on TV and waved their little flags? I have no idea, so let's talk cake.

The traditional Battenberg has 2 colours and 4 squares, but I decided to make a 9-square cake. I sort of followed the challenge recipe, but was out of almonds, a major ingredient, the day I decided to make this. So, I used freshly grated coconut (I often have a coconut on hand) in the vanilla and chocolate layers and pistachio in the green layer. I didn't use food colouring, but got a nice green because I am very particular about blanching and peeling pistachios so the reddish skins don't discolour anything. It takes forever, but it's a good task when you are listening to the radio or watching TV. I had a small package of marzipan from Ikea, so used that to cover the cake, but I had to roll it quite thin and it was hot and humid so that was a bit tricky. Don't buy marzipan from Ikea--it's cheap but has absolutely no flavour. I kneaded in some almond extract, but that made it even stickier. The cake kept well, but the marzipan all stuck to the plate the next day.
I baked the cake in a small sheet pan and it was just dumb luck that I got nice squares by dividing each colour into thirds. I really enjoyed all the measuring and trimming and assembling of this cake. I am usually quite slapdash in the kitchen so a bit of precision does me good every once in a while. Which reminds me that I ran out of homemade apricot jam halfway through assembly and had to finish up with homemade orange marmalade. Thanks to Mandy of What the Fruitcake?! for a fantastic challenge, apparently put together quite last minute! Don't you love that blog name? Check out all the wonderful Battenberg cakes at The Daring Kitchen and read the challenge PDF for the recipes and the history of the cake and its name.

Blog-checking lines:
Mandy of What The Fruitcake?! came to our rescue last minute to present us with the Battenberg Cake challenge! She highlighted Mary Berry’s techniques and recipes to allow us to create this unique little cake with ease.

Oops--looking at The Daring Kitchen homepage, I realized I had forgotten to post my from-scratch cannelloni 2 weeks ago. I did make it! A triple recipe, in fact, which was just the thing for a stiflingly hot day (I sweat remembering it). Here's a photo:
Left: meat filling Right: spinach and ricotta. Both with tomato sauce and pesto bechamel. Mmm.

Friday, June 8, 2012

Banana Chiffon Cake


If you're anything like me, you buy bunches of bananas only to see them all ripen at the same second, so you miss your perfect banana-eating window of opportunity, whatever it is. For me, that window is tiny and complicated by the fact that I only like bananas on cereal or in a peanut butter and banana sandwich. I never eat them on their own. Oh, and I rarely have bread or cereal in the house. So why do I keep buying bananas, you may wonder? To bake with, of course. I think we can all get tired of banana bread, though, no matter how tasty it is. This chiffon cake has all the flavour of banana bread, but is light and airy. It's not as light as a plain sponge cake, but it absolutely melts in your mouth. And it's pretty easy, for something so huge and impressive looking, if I do say so myself.

I made one at Christmas which I frosted with a thin layer of bittersweet ganache, but cream cheese frosting is my favourite here. Use your standard recipe, but lighten it up by beating in milk until it has a consistency more like whipped cream than dense frosting. I'd give you more precise instructions, but I made this months ago. In February, actually. That's my excuse for the rather grim light in the photos. I do have the cake recipe for you, at least!

Banana Chiffon Cake
Source: My mother's kitchen Bible 1960s Purity Flour cookbook


2 cups all-purpose flour
1½ cups sugar
3 teaspoons baking powder
1 teaspoon salt
½ cup vegetable oil (I used grapeseed)
5 egg yolks
1 cup mashed banana
1 teaspoon lemon zest
¼ teaspoon freshly grated nutmeg
¼ cup water
1 teaspoon vanilla
1 cup egg whites, at room temperature
½ teaspoon cream of tartar

Your favourite cream cheese frosting, lightened with milk to a soft consistency (or chocolate ganache)
Pistachios to garnish

  1. Sift dry ingredients into a large bowl. Make a well in dry ingredients and add oil, egg yolks, banana, lemon zest, nutmeg, water and vanilla and beat until smooth.
  2. Beat egg whites until frothy. Add cream of tartar and beat until stiff peaks form.
  3. Gradually fold the batter into the egg whites. Turn into an ungreased tube pan and use a knife to cut through any large air bubbles. Bake for 1 to 1¼ hours, until a tester comes out clean. Invert to cool completely. 
  4. Run a thin knife around the pan edge and tube to loosen the cake. Invert onto a serving platter and frost generously. Garnish with pistachios if desired.
Oh, and guess what? I bought a bunch of bananas the other day...

Sunday, May 27, 2012

The Daring Bakers Make Challah

Ruth of The Crafts of Mommyhood gave us a great challenge this month. I love challah and braided bread so I had a lot of fun with this, even if I did leave it till the last minute. Since the pulla I made was quite similar to challah, I decided to do a couple of new things with the dough, with varying levels of success. First, the good:
I made a braided round loaf using Ruth's very helpful video. It is a 4-strand braid and is a technique I'll use again and again. Here's what it looked like after I baked it. No pictures of it sliced, as I gave this one away, but I haven't heard any complaints yet. 
Next, I decided to do a filled loaf. There had been lots of beautiful ones on the forum, but none of them had rhubarb. Did I tell you that my nephew and I picked 10 pounds of rhubarb at my mother's? And that there's at least that much more for next weekend? Heaven! Here's the Bjorn Borg of rhubarb himself:
So, what to put with the rhubarb? I decided on pistachio paste, since there had been a can of it lurking in the cupboard for a while. Good idea, but I put way too much of the pistachio paste and roasted rhubarb, because I'm greedy. 

It was impossible to seal the cylinders and even harder to braid them. Oh, and I had six strands to work with! The unrisen braid was leaking rhubarb syrup and by the time it had risen it had popped open in a few places. It wasn't very pretty, but it was delicious. I may try this combination again and exercise a bit of restraint. Or not.

Thanks Ruth! That was fun! You can find all the challenge recipes here
Blog-checking lines: May’s Daring Bakers’ Challenge was pretty twisted – Ruth from The Crafts of Mommyhood challenged us to make challah! Using recipes from all over, and tips from “A Taste of Challah,” by Tamar Ansh, she encouraged us to bake beautifully braided breads.


Friday, April 27, 2012

The Daring Bakers Visit Armenia

We were challenged to make one or two desserts this month, and I made both, as they sounded so good. I was not familiar with Armenian baking, so I was eager to see what was in store. The first dessert was a simple cake with a crumb base, flavoured with nutmeg and sprinkled with walnuts. I went with cardamom and pistachios instead.
As you can see, the pistachios migrated a long way from the top of the cake. The batter was very liquid and I watched all the nuts get sucked into a vortex in the centre of the cake and disappear. Remember that I haven't got TV reception. The flavour and texture of the cake were good, but it reinforced why I do not like crumb cakes. The base was too rich and sweet and greasy and I ended up cutting it off. I made a second version of this cake, halving the sugar, doubling the egg and mixing all the crumbs with the egg and milk and much preferred the result. The batter was thick, the nuts stayed where they were supposed to, and it baked in the suggested time, unlike the crumb cake, which took much longer for many Daring Bakers. No photo of that one, sorry.
The second dessert was totally unfamiliar: nazook. A rich, but unsweetened butter and sour cream yeasted pastry wrapped around a rich and buttery filling. I made mine small, so they were crisp but tender. I used mahleb (or mahlab), a spice made from dried cherry pits to flavour the pastry and I used the given recipe for a vanilla filling. The mahleb gave a faint cherry-almond taste. These were delicious with coffee or tea, but again I would reduce the sugar next time. The pastry was amazing though, and so nice to work with. I didn't want to stop kneading it, even though I hate touching sour cream. That stuff is nasty, even if it does do wonders in baking.

Thanks to Jason of Daily Candor for a great challenge! You can find the full challenge post here, with step-by-step photos and a great video of Jason and his aunt Aida making nazook.

Blog-checking lines: The Daring Bakers’ April 2012 challenge, hosted by Jason at Daily Candor, were two Armenian standards: nazook and nutmeg cake. Nazook is a layered yeasted dough pastry with a sweet filling, and nutmeg cake is a fragrant, nutty coffee-style cake.

Saturday, April 21, 2012

Finnish Pulla: Braided and Chocolate Swirled

Oh, hello. Are you still there? I can hardly blame you if you've up and left. In fact, I left myself for a bit, but I brought you back the most delicious sweet bread with cardamom. This bread has long been one of my favourites, but I can't make it too often, as I find myself wanting to eat it for every meal, dessert and snack. It's a good thing I gave half of it away.
Here's the baked bread. I used the 6-strand braid, just because. I usually just do a simple 3-strand braid, but wanted the plumper loaf. The technique is easy. I watched this video, then found myself repeating the steps aloud as I braided. 
Here's the loaf before the egg wash, pearl sugar and baking. You can see the cardamom in it. I grind it in a mortar and pestle and never have the patience to make it really fine. Also, the cardamom I buy at a local Indian food shop is really powerful and I will reduce it a tad next time. If you're using pre-ground, definitely use the full amount.

I used half the dough for the braid, but had a bit of marzipan left over, so I filled this loaf with a made-up mixture of marzipan, butter and melted bittersweet chocolate. It was a bit too gloopy and rolling it was a mess, but the end result was pretty tasty. I used chocolate because I actually made this in February for Lisa's Bread Baking with Chocolate post, which I think was due by the first of March. Oops.
I used this pulla recipe from Julia at Melanger. The filling was equal parts of butter, marzipan and chocolate (about 100 grams each), but next time I will chop the chocolate instead of melting it. To make the swirl, I rolled the dough in a rectangle, spread it with the filling, then rolled it and cut it lengthwise before twisting it up. Joining the ends was tricky, as it there was chocolate everywhere by this point. It looked like this before baking:
Notice that I cropped off the really messy bit. Anyhow, see you next week with the Daring Bakers reveal. I wish I had made more of this to eat while watching Nadal-Djokovic tomorrow. Sigh.


Monday, February 27, 2012

The Daring Bakers' Challenge was Quick!!

Quick breads, that is. Now what is a quick bread? To me, it's a cake baked in a loaf tin. In my family, if something is baked in a loaf tin, it needs butter slathered on it, no matter if there is already butter in it. This was another challenge that wasn't very challenging, but I made 4 quick breads: pumpkin, lemon-yogurt, banana and Nutella swirl. 2 went to a friend, one was all mine and the last one went to my mother's. I didn't stick around, but I bet she put butter on it.
Pumpkin-spelt loaf
I based the recipe on this one, replacing the whole wheat flour with spelt, the olive oil with grapeseed oil, using my own frozen pumpkin puree, and replacing half the cinnamon with ginger. I should really type out the recipe...
Lemon-yogurt loaf
I made this one to take to a friend, so no sliced photos. We had trouble coordinating our schedules, so this sat, wrapped, on my table for 3 or 4 days before I got it delivered. I just unwrapped it and glazed it with a bit of lemon juice and sugar and it was fine. I used this recipe and pretty much followed it. 
Imagine!
Future Nutella swirls?
I like the yogurt cake linked above so much that I made it again, this time replacing the lemon with vanilla, adding chopped roasted hazelnuts and about half a jar of Nutella. I didn't get the swirls I wanted, as the textures were so different--the batter is quite thin. Next time, I would whisk the Nutella into a portion of the batter for better results.
The cake itself was delicious. It tasted rich and buttery without any butter. We ate it in thick slices with  coffee.
Thanks Lis for stepping in and giving us a fun challenge! Here is the challenge PDF, though once again I didn't use any of the recipes. 

Blog-checking lines: The Daring Bakers’ February 2012 host was – Lis! Lisa stepped in last minute and challenged us to create a quick bread we could call our own. She supplied us with a base recipe and shared some recipes she loves from various websites and encouraged us to build upon them and create new flavor profiles.


Tuesday, February 14, 2012

Llapingachos and Pupusas: The Daring Cooks

Late again, that's me. The Daring Cooks' challenge this month was to make patties of some sort. I must admit, I wasn't too enthused at first, as challenges recently have been less than challenging. I kind of like looking for obscure ingredients and making time consuming dishes. Since that wasn't necessary, I challenged myself to make a dish I had enjoyed in Ecuador and another from El Salvador that I have loved for a long time but never eaten. And you know what? I loved the challenge. I would probably never have got to making either of these things without it. So thanks,  Lisa and Audax!
First up are the llapingachos. I had these as part of my first meal in Ecuador, in Quito and I also had them when I visited Cuenca. They were not common on the coast, but they really hit the spot on those chilly nights at high altitude. And they were fun to order too. Llapingachos are a kind of mashed potato cake, seasoned and coloured with achiote. Inside is melty cheese and they are topped with an interesting array of toppings. First was a warm peanut sauce with hard-boiled egg, pickled onions, tomato and salsa. You can also see the avocado behind, but it just wouldn't fit on top. Actually the llapingachos I had in Ecuador didn't have the peanut sauce but I quite liked the combination.
The melted cheese. Mmm.
Next up was pupusas, something I've been eating for years. Unfortunately they are hard to find here so I don't have them as often as I'd like. Now that I know how easy they are to make, I think they'll be making many more appearances on the table. Pupusas are masa cakes stuffed with any combination of cheese, beans or meat. The ones in the photo have leftover pulled pork in them, but my favourites were the cheese ones. 
The pupusas are topped with curtido, a slightly pickled coleslaw. I also like a bit of plain tomato sauce on mine, but I don't know if that's traditional. The ones in the photos are cracked because I refrigerated them overnight before cooking them, but it really should be done last minute. They only take a few minutes to form and 5 minutes a side to cook.
There's melty cheese in here too. Can you find it?
Thanks to Lisa and Audax for a great challenge. Here is the original challenge pdf, though I didn't use any of the recipes. Click on the names for recipes for llapingachos, peanut sauce, pupusas and curtido.

Blog-checking lines: The Daring Cooks’ February 2012 challenge was hosted by Audax & Lis and they chose to present Patties for their ease of construction, ingredients and deliciousness! We were given several recipes, and learned the different types of binders and cooking methods to produce our own tasty patties!


Wednesday, February 8, 2012

Chocolate Chestnut Cupcakes

Yup, more chestnuts, and more chocolate too. I think they are a nice pair, much better than chocolate and orange. In previous posts, I seem to have implied that I hate chocolate, but that's not the case. I just don't find it very appealing in bar form. But a cake? Mmm. Oh yes,  and I love labour-intensive chestnuts. I am still working on using up the jars of jam and the candied chestnuts. I made these cupcakes one night when some friends came over for dinner. I had planned to make a layer cake filled with the mousse but ran out of time. In fact the cupcakes my guests got didn't look at all like the above. They got the tin of cupcakes, the mixing bowl of mousse and the jar of candied chestnuts in syrup. It was an assemble-your-own kind of evening. I saved this one for the next morning. A single photograph and it became breakfast. Magic.

Chestnut Mousse
Source: The Cake Bible
2 cups whipping cream, chilled
1 cup sweetened chestnut puree with vanilla
rum to taste, optional
  1. Whip cream until soft peaks form, then fold in chestnut puree and rum. Combine well. Whip a bit more if you want stiffer peaks. Keeps chilled for a day or two.

For the cupcakes, I used half the recipe for the German Chocolate Cake, baked for 15-20 minutes at 350.  

To serve, top the cupcakes with the mousse and candied chestnuts, if desired. Makes 12, with a very generous amount of mousse.

Tuesday, January 31, 2012

Spice School: A Course in Masala Mischief!

Because I need more school in my life I joined Mr P of Delicious Delicious Delicious and Sanjana of Ko Rasoi in this exploration of spices and Indian vegetarian cooking. We will post on the last day of the month and if you'd like to join you can find a clear explanation here and a list of the first 4 dishes in the 'curryculum'. I love Indian food, as I may have mentioned here and went on a bit about in my appam challenge. I love both sweet and savoury spices and one of my favourites is mustard seed. That was the focus this month and I was in as soon as I saw that. Now, some of you may remember that I am not a big fan of potatoes. In fact, they were the only ingredient I had to go out and buy in order to make this dish. I only bought half the specified weight, which was too bad, as this was delicious. I make an exception for curried potatoes. We ate it on rice for some winterlicious carb on carb action. 
Next month: Exploring Carom Seeds with Crispy Potato Bhajia. 
Hmm, more potatoes. I will grow to love them. It's in my genes, somewhere.
You can find the recipe on KO Rasoi.

Saturday, January 28, 2012

Chestnut Lamingtons


Happy Australia Day! I can't believe I missed it even though we are 16 hours behind. I guess I was too busy watching tennis. Rafa! Mr P over at Delicious Delicious Delicious is hosting Reinvent the Lamington again this year. Well, it's his invention, so I'm not sure who else would host it. Anyway, I look at the amazing creations every year and I come up with lots of ideas, but I've never actually participated before. After leaving a comment over at DDD, I got a reply strongly urging me to get some lamingtons made. And so I did. Nothing earth-shattering over here, but at least I found a good use for my homemade candied chestnuts and chestnut jam.

Yes, I made my own candied chestnuts and chestnut jam last fall. It was a dangerous combination of gorgeous autumn produce, sporadic employment and temporary insanity after returning from Ecuador. It was a good thing I wasn't working, as the chestnut jam took all day to make and the candied chestnuts took about 4 days. By that time I couldn't be arsed to blog about them or even take photos. In fact, I couldn't even eat the stuff as it just tasted like too much effort for 5 small jars. The candied chestnuts, which never softened enough, have been taking up valuable real estate in the fridge and the jam has been languishing on the counter. I gave 2 jars away at Christmas and nobody knows what to do with it. So, I made some chocolate and chestnut mousse cupcakes last week and now lamingtons. If you have any other ideas, please let me know. I have 2 jars left. And no, I'm not sending it to you unless you pay the postage. Sporadically employed, remember?

I made ⁴/₇ of this recipe for the cake and ½ the glaze recipe for 9 lamingtons. Instead of chestnut, you can leave them unfilled or use another jam. Roll them in the traditional coconut or nuts instead of chestnuts. I also made some with coconut and a lovely raspberry cassis jam that a friend made. Too bad I ate them/gave them away before getting photos--they were the prettier of the lams.

Saturday, January 21, 2012

Mexican Chocolate Streusel Cake

After making the atole in the previous post, I was left with almost a whole package of Ibarra chocolate. I looked in my Mexican cookbooks for ideas and found this cake. I think Rick Bayless makes amazing Mexican food, but I don't think he's much of a baker. This cake was good hot out of the oven (you can see above that I helped myself to the middle piece), but I found it very firm when it was cool. It reminded me of those snack cake mixes I used to beg my mother to buy as a child and then never ate once they had cooled off. Why a boxed mix? I thought I was deprived with all the homemade food we had. Silly me. 
Anyway, if you have nostalgia for the snack cakes of yore, this is for you. It's not extremely chocolaty and the streusel is not too streusely. Hmm, I'm not a big fan of either chocolate or streusel. This poor cake never stood a chance. 

Mexican Chocolate Streusel Cake
Adapted from Mexico One Plate at a Time, Rick Bayless et al
Makes one 9"x13" cake (I made a half recipe in an 8" pan)

One 18-19 ounce (510-540 gram) package Mexican chocolate, such as Abuelita or Ibarra, coarsely chopped
For the streusel topping:
1 large egg yolk
½ teaspoon salt
7 tablespoons (3½ oz/100g) unsalted butter, softened
⅔ cup (3 oz/85 g) all-purpose flour
⅔ cup sliced almonds
For the cake:
1¾ cups (8 oz/227 g) all-purpose flour
1¼ teaspoons baking powder
½ teaspoon salt
8 oz/227 g cream cheese, at room temperature
8 oz/227 g unsalted butter, at room temperature
½ cup sugar
4 large eggs, at room temperature
1 teaspoon almond extract

  1. In a food processor, pulse half the chocolate until it is like breadcrumbs. Set aside in a bowl. Add the remainder of the chocolate and process it to breadcrumb consistency. Add salt, butter and flour and pulse until just combined. It should be crumbly, not a paste. Add almonds and pulse just to mix in.
  2. Preheat oven to 350℉/175℃. Grease baking pan. Sift together flour, salt and baking powder.
  3. Cream butter, cream cheese and sugar together until light and fluffy. Add the eggs one at a time, beating until well blended after each one. Scrape bowl and beat in almond extract.
  4. Add flour mixture and mix in on low speed until almost thoroughly combined. Add remaining chocolate and mix gently.
  5. Scrape batter into prepared pan and level it. Sprinkle streusel on top, breaking it up as you do so.
  6. Bake 35-40 minutes, until springy, the edges have just begun to pull away from the edges of the pan and a tester comes out clean. Cool slightly on a wire rack and serve warm. Apparently it keeps, well-wrapped for a few days, but I found it very firm the next day. Eat this right out of the oven!


Saturday, January 14, 2012

The Daring Cooks Make Tamales!


My favourite memory of my first trip to Mexico was learning to cook many special dishes. I stayed for a month, with a former student in Queretaro. In the evenings, I helped her to plan her lessons in English, as she was also a teacher, but I had the days to myself. I did a lot of wandering around on my own and her mother and sister took me to different markets and restaurants, gathering ingredients and being invited into the kitchen. It was hilarious, because neither of them spoke any English and I didn't know much Spanish. We were all comfortable in the kitchen, though. I really must do a post on some of those dishes, but right now we need to talk tamales!

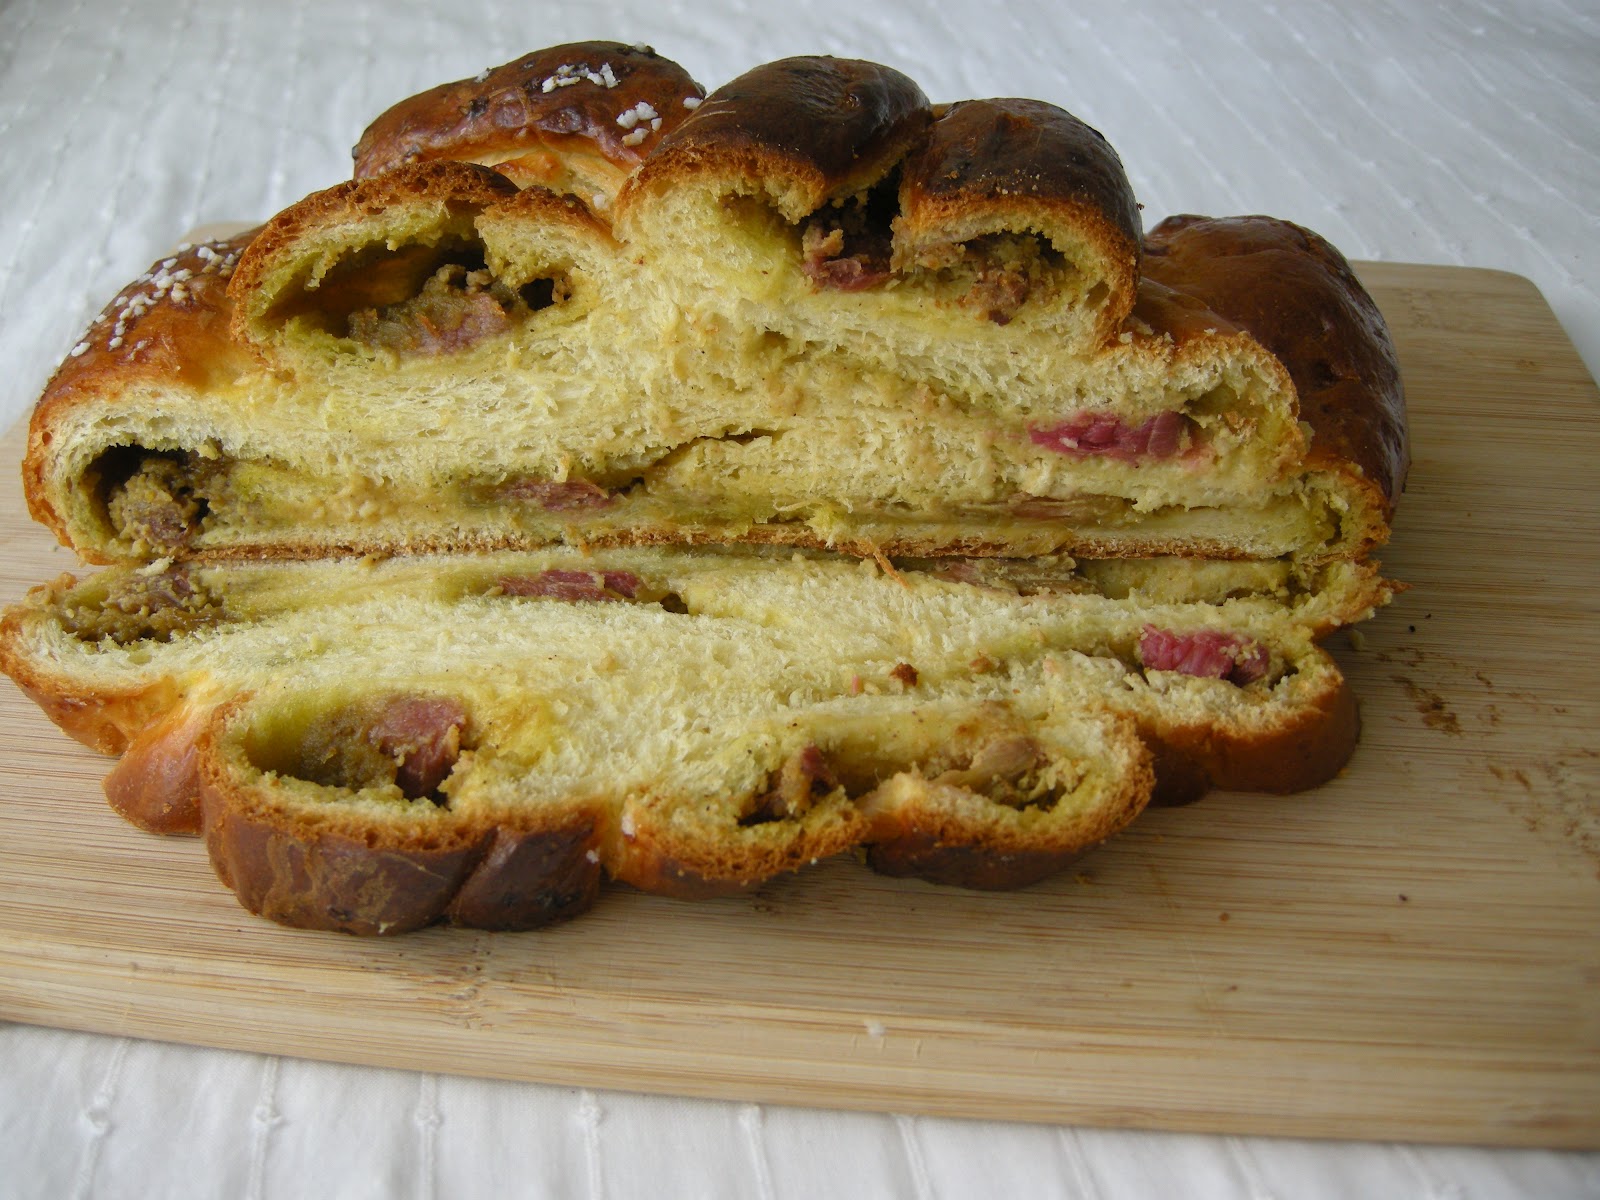
This was just about the best cooking challenge I could imagine. I had been wanting to make tamales for a long time, and in fact had had a bag of masa for tamales in my freezer for ages for just that purpose. I almost chose them for my own Daring Cooks' challenge but went Indian instead. The only thing holding me back was ... sheer laziness. I had heard that they were a lot of work and as you can see by my sparse posting here I just wasn't in a blogging mood. Maranda's challenge was just the kick in the pants I needed. I made two varieties: the ones above are pork cooked in guajillo chile salsa and wrapped in banana leaves. Below are chicken in a green chile and tomatillo salsa and wrapped in corn husks.
I much preferred the chicken ones. The corn husks were easier to work with than the banana leaves and the filling was far tastier. I think I got a dud batch of guajillo chiles, because the filling was bland. I ended up spicing up the remaining sauce with a couple of chipotles in adobo and that did the trick--wish I had thought of that when filling them. So, were they a ton of work? I don't think so. I spaced out the making of the filling and preparing the wrappers, then was able to wrap and tie about 25 corn and 18 banana tamales in the time it took to watch 1 episode of Mad Men. That Don Draper sure does make time fly. Then I steamed them and gave some away and froze the rest.
That cup in the back is one I got in Queretaro just before I left. It is my Mexican hot chocolate cup (I have many dishes that are only used for one specific food). I tried my hand at atole to accompany the tamales, as it is traditional. Atole is like hot chocolate thickened with corn masa. It's as thick as heavy cream, but made with a mixture of water, milk, masa and Mexican chocolate. I never liked it before, as it has a distinct corny flavour, but I added a dash of almond extract and ended up drinking 2 cups instead of eating the plate you see above. It was astonishingly good. Here's the recipe:

Chocolate Atole
Adapted from Rick Bayless

⅔ cup masa harina mixed with ½ cup warm water
8 ounces chopped Mexican chocolate (Abuelita or Ibarra)
3 cups water
3½ cups milk
1 teaspoon almond extract, optional
  1. Combine masa, chocolate and 3 cups water in a blender, blend until smooth. Place in a saucepan with the milk and cook, stirring constantly, over medium heat until it comes to a simmer. Thin with milk or water if it's too thick. Add almond extract (cinnamon would be good here, or rum).
  2. Strain into cups, or for frothy atole, strain into the rinsed blender and blend before pouring into mugs. 
Thanks so much to Maranda of Jolts & Jollies for such a fun challenge! You can see all the beautiful results on the Daring Kitchen homepage. Click here for the full challenge pdf with recipes, links and photos. 
Blog-checking lines: Maranda of Jolts & Jollies was our January 2012 Daring Cooks hostess with the mostess! Maranda challenged us to make traditional Mexican Tamales as our first challenge of the year!