Wednesday, March 31, 2010

My new favourite pizza?

Yes, Mr Blogspot, I am ignoring the red squiggly line under favourite. That's how it's spelled here, like it or not. Nobody's listening to you anyway, since blogspot has its own squiggly line. Let's talk about my pizza instead.
The photo is terrible, but it was after dark when I made this, and this is the best I could do. What you're looking at is a base of creamy chipotle spinach, topped with sweet potatoes, feta and cilantro. 

Make the pizza dough first, and then the spinach, so it can cool while the dough is rising. If you are using tiles or a pizza stone, preheat oven to 500/550℉ at least 30 minutes before you want to bake the pizza. If you are using a cookie sheet, preheat it for 10 minutes or so.

Basic pizza dough (from Gourmet Today)
2¼ teaspoons active dry yeast
about 1¾ cups unbleached all-purpose flour, plus additional for kneading
¾ cup warm water
1½ teaspoons salt
1½ teaspoons olive oil

Stir together the yeast, 1 tablespoon flour and ¼ cup warm water in a measuring cup and let stand until creamy, about 5 minutes. If nothing happens, you need new yeast.
Stir together 1¼ cups flour and the salt in a large bowl. Add the yeast mixture, the remaining water and the olive oil and stir until smooth. Add enough of the remaining flour (about ½ cup) so dough comes away from sides of bowl. The dough may be wetter than other doughs you've made (I didn't find this).
Knead dough on a dry surface with lightly floured hands until smooth, soft, and elastic. This dough was great: very silky, but not sticky at all. Form into a ball, put on a lightly floured surface and generously dust with flour. Cover loosely with plastic wrap (or the large bowl you just dirtied), and let rise in a warm, draft-free place until doubled in bulk, about 1¼ hours. 
To shape dough, do not punch down dough, but generously flour it and transfer it to a dry work surface. Holding one edge of dough in the air with both hands and letting bottom just touch the surface, quickly and carefully move your hands around edge of dough as though you were turning a steering wheel, allowing weight of dough to stretch round to roughly 10 inches. Okay, that's confusing--just shape it however you usually do! More detail from the book: lay dough on a floured surface and continue to work edges with your fingers, stretching it to a 14-inch round. Lay the dough on a peel dusted with cornmeal. Top with spinach, and then sweet potatoes and crumbled feta, or other cheese, a little or a lot. Bake for 10-12 minutes if using tiles, a few minutes longer on a baking sheet. Sprinkle with chopped cilantro. 


Creamy chipotle spinach
about ½ cup whipping cream
1 bunch spinach, washed and trimmed, or an 8-ounce bag
1 chipotle in adobo, chopped
salt to taste

Combine cream and chipotle in a wide, flat pan, over medium-high heat, and reduce cream to about ¼-⅓ cup. Add spinach and salt, and turn, until wilted. Set aside to cool. 

Just before baking, peel and slice your sweet potato very thinly. I steamed mine for a few minutes, but I don't think it was necessary, as I cut them on a mandolin. 

The before picture:


Tuesday, March 30, 2010

TWD: Coconut tea cake


I was so excited about this cake that I made it more than a week early. Yup, you read that right. Now, anyone who knows me knows that I am never early for anything, but it seems like we've been making lots of cookies and tarts at TWD, and cake is my favourite thing to bake and eat. I even went hunting in my mother's basement to find a bundt cake pan. Unfortunately when I was turning the cake out I saw that it was recommended for microwave use. Oops. Guess that's why the outside of the cake was a bit too brown in spots. It didn't melt, but that was probably just luck. I think this pan dates from the 80s, when my parents bought their first microwave--a behemoth Panasonic Genius. My mother still has it, and she can have the pan back too.
:)

I used fresh coconut both inside and on top of the cake. I also added 1 teaspoon of ground cardamom, but the flavour wasn't that strong, so I'd add more next time. Interestingly, in the TWD P&Q forum (that's problems and questions), some found that the optional cardamom overpowered, but I have been taste-tasting the cake for days (it's a good keeper), and I still can't taste it. Instead of rum and vanilla, I added some of my homemade extrait antillais: a mixture of rum, vanilla beans, mace, tonka beans and sapote. It smells like heaven, even though I only made it a couple of weeks ago and it needs longer to get really strong. I tried to get a photo, but it looks like alien parts in a bottle, so just use your imagination. I also glazed the cake with some cream cheese icing that I thinned with the leftover coconut milk and more rum.

I usually don't like bundt cakes much, but this was nice: the coconut added a nice texture, and it was lighter than I expected, and very moist. Again in the P&Q some found this a bit dry, but I think the fresh coconut helped. The cake lasted 4 or 5 days, and kept very well. This week's recipe was selected by Carmen of Carmen Cooks, so she's got the recipe. Thanks for a fantastic pick Carmen!

Saturday, March 27, 2010

Daring Bakers' March Challenge: Orange Tian


Tian? What? It certainly sounds fancy, doesn't it? A tian is a layered dish, either sweet or savoury. The required components for this month's challenge were:
  • the pastry base (pâte sablée)
  • the orange marmalade
  • the whipped cream
  • the citrus segments
  • and a caramel sauce 
I was excited about making marmalade, as I have made all sorts of preserves before, but never marmalade. I got so excited that I made about 3 litres of the stuff, or 14 jars! I used a tablespoon in the tian recipe, so there are leftovers. Want some? I've been eating it instead of ginger honey on my toast, but considering I don't eat much toast, it could last a while. I made it with Seville oranges, and it was delicious, but there was definitely a bitter undertone.  The colour was beautiful, so I may just hang a jar in my window as a suncatcher. Except I don't get much sun in my apartment. This photo was taken at my mother's--she gets lots of sun.

I really spaced out the components of this challenge. About a week after the marmalade I made the caramel and segmented the oranges (navel and blood) and grapefruit as they had to sit overnight in the caramel. The next day I made the pâte sablée and realized I had no whipping cream to make the filling. So, the citrus got an extra day in the caramel. At least some of it did--it was pretty tasty.

The next day it rained and was completely grey outside, so I postponed again. My north-facing apartment gets little enough light as it is, and I couldn't get enough to photograph anything in natural light. Of course I haven't got lights--I'm using a point and shoot camera! So, I just ate a bit more of the fruit and hoped I'd have enough to put the dessert together.

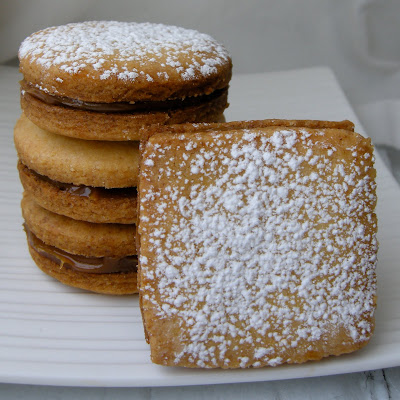
Once I finally remembered to pick up the whipping cream and the weather cleared up it came together really quickly. The recipe called for stabilizing the cream with gelatin, but since I was only making 2 small tians I didn't think this was necessary. I had read in Rose's Heavenly Cakes that dulce de leche could be used to sweeten and stabilize whipped cream, so I did that, as I thought that it would be nice with the caramel sauce, and it was. I already knew that dulce de leche went very nicely with the pastry, as I had made cookies out of the leftover pastry, sandwiched them together with dulce de leche and used them for Tuesdays with Dorie just a day earlier. Recycling is in, people!

These were delicious! The crisp and buttery pâte sablée base with the caramel whipped cream, fresh citrus and more caramel sauce made for a great combination. I used Seville orange juice in the caramel sauce, so it was not very sweet. The marmalade in the cream was a nice surprise too. Well, not really a surprise, since I had just made it, but I was still somewhat surprised to find it there. Not paying attention can have its benefits!

Mandatory blog-checking lines: The 2010 March Daring Baker’s challenge was hosted by Jennifer of Chocolate Shavings. She chose Orange Tian as the challenge for this month, a dessert based on a recipe from Alain Ducasse’s Cooking School in Paris. 

Thanks Jennifer for a great challenge! Check out the slideshow to see what all the rest of the fabulous Daring Bakers have come up with this month.
:)

Recipes after the jump.


Friday, March 26, 2010

Lemon yogurt cake

Hi! Welcome to my new, or at least, slightly updated look. What do you think? Really? Thanks! Or not...

This cake seems to be everywhere on the blogosphere these days, and with good reason. It's moist and has a strangely addictive texture--spongy yet melt-in-your-mouth tender. I much prefer sponge cake to pound cake, which I often find too dense. I added some lemon zest and topped it with a simple lemon juice and icing sugar glaze, cause I'm taking it to the same lemon-loving kids that got the thumbprint cookies
I have a handwritten (imagine!) recipe for this from the late 90s. It was given to me by a food-obsessed student from France. Unfortunately I've lost touch with her, but I still make the cake. Well, except that her recipe calls for measuring the ingredients in the little yogurt pots and I buy my yogurt in giant tubs. So, I just use this recipe from Epicurious, though there are many others. The only changes I make are to beat the eggs and sugar until they are thick and light before adding the rest of the wet ingredients, including the oil. I usually reduce the oil a bit, to ⅓ cup or so, and sometimes use melted butter instead. I do find that it always takes longer than the specified 50-minute baking time, so expect it to take an hour or so, unless it's just my oven. Oh, and I've never used the marmalade glaze. I usually just boil lemon juice and sugar together and pour it over the cake. I just thought the icing sugar glaze was more kid-friendly (and by that I mean sweeter). This cake keeps well, but you'll find yourself cutting a slice every time you pass by it. No worries--it only takes a few minutes to whip up another. Enjoy!

Tuesday, March 23, 2010

TWD: Dulce de leche duos, my way


If you're a member of Tuesdays with Dorie, you're probably thinking that your cookies didn't look like the ones above. That's because the ones you can see are NOT Dorie's cookies. I was a bit skeptical about the original recipe, and with good reason, it turns out. These were the ugliest cookies I've ever made! There was no picture of them in the book, either. Very suspicious...

I love dulce de leche and have made it a number of times (from scratch--none of that can-boiling business for me).   The cookie batter just seemed to have too much sugar (white+brown+dulce de leche) so I left the white sugar out, hoping they wouldn't be too sweet. Maybe this is why my cookies didn't really spread, and looked like homely little lumps after baking. I made the second tray smaller, and just ended up with smaller lumps. I added oatmeal to the third tray for the lumpy lump effect and wondered why I hadn't made only half a batch...

Anyway, people seemed to like them, but they were too cakey for me, and I couldn't get past their appearance. So, what to do? Skip posting this week, even though I made the cookies, or make another batch of something? I had some pâte sablée in the freezer, so decided to roll and bake a few of these to fill with dulce de leche. Much better: the cookies were crisp and buttery and the filling didn't just soak in and make them even cakier. If you're still reading this, you deserve a good laugh, so check after the jump for the photo of the original cookies. Better still, head over to the TWD blogroll to see what they were supposed to look like. This week's recipe was chosen by Jodie of Beansy Loves Cake. I bet hers look nice!


Monday, March 22, 2010

Blackberry buckwheat pancakes, or breakfast of the under-employed, part 2


Ah, it's the Monday after March break and I guess all those teachers are feeling sufficiently rested to go to work today! So, no calls for me, but I did get a good sleep, at least until the garbage truck came by. After a cup of tea I decided to have pancakes, and I wanted to use the buckwheat flour I picked up in Montreal. So, I went searching, and found this recipe on A Whisk and a Spoon. The only changes I made were to use yogurt instead of buttermilk, omit the honey, and add a pint of blackberries. Why? Well, I didn't have any buttermilk, I usually don't put sweeteners in my pancakes because I drown them in maple syrup, and blackberries are good (and threatening to go moldy in my fridge). These were delicious--hearty and sweet and tart with the fruit and syrup. The batter was super sticky, and got stickier the longer I let it sit. The buckwheat flavour was mild, and next time I'll use more buckwheat than flour. Happy Monday!

Wednesday, March 17, 2010

Happy Saint Patrick's Day!


In celebration of a great holiday, I bring you.... coffee jelly with marsala cream! I had some extra coffee and extra filling from the tiramisu challenge, so this is what I did with it:

Coffee rum jelly:
1 tablespoon gelatin
3 tablespoons water
¼ cup sugar
2 cups strong coffee
rum or liqueur to taste

Sprinkle the gelatin over the water in a small saucepan and set aside for a few minutes. Add the coffee and sugar, and stir, heating, until the gelatin and sugar are both dissolved completely. This won't take long at all if your coffee is hot. Stir in the rum and pour into glasses or ramekins and chill. Serve with whipped cream. The marsala cream I used had 4 separate components, so I don't recommend making it just for this, but you could always add more booze to your whipped cream.

Oh, and if you were looking for something Irish, I made some wheaten bread a while back. It'd be good with a real pint of Guinness.

Sunday, March 14, 2010

Happy ∏ Day!

∏=3.14. Pi Day=March 14 (3.14). Get it? Now, I'm sure that pi is a very useful thing, but I'm all about the pie, so let's get on with it.
:)
It's March break week, which means that all the kids are in Florida, teachers are enjoying a well-earned week off, and us supply teachers are wondering if we'll get any calls when the break is over. I think we always wonder that. Actually, I'm trying to fight off all the germs I caught from the kindergartners, but I won't go into any detail about that.
For Pi Day, I decided to make a maple sugar pie. It's so easy--a pie crust and 3 ingredients, and it helps me use up my maple sugar so I can get some new stuff. It's sugaring off time, and my family live in the 'maple syrup capital of Ontario', I kid you not. There are tons of sugar bushes around, and I visit every year. If they are boiling sap, the smell is heavenly, and you should bring a lawnchair and just camp out beside the boiler. It's like a maple sauna.
My mother and I went this morning and got 4 litres of syrup: 2 each of light and amber. I visited the evaporator room, sampled everything they had and had some taffy on snow too. They didn't have any maple sugar, so that means another trip soon.

Maple Sugar Pie

1 baked pie crust or tart shell, cooled

1 cup maple sugar
¼ cup flour
1½ cups whipping cream

Preheat oven to 350℉. Whisk maple sugar and flour together and add cream. Stir well. Pour into pie crust and bake for 35-45 minutes, until just set. Cool. Serve warm or at room temperature. This is traditionally served with unsweetened cream, whipped or not.

The pie has a creamy, custardy filling, and is very maple-y. Brown sugar can be substituted, but it won't be the same at all. Some versions call for eggs and evaporated milk, but this one has the purest flavour, I think.

Tuesday, March 9, 2010

TWD: Thumbprints for us big guys


This week's Tuesdays with Dorie recipe was chosen by Mike of Ugly Food for an Ugly Dude, so head over to his blog for the recipe. As written, this is a shortbread-style cookie with ground hazelnuts and a raspberry jam filling. I decided to use ground almonds with a lemon curd filling because
a) I had no hazelnuts, and
b) I was taking these to a friend's place.
She has a pathological aversion to raspberry seeds and has passed it on to her children, but they do all love lemon. I also used dark brown sugar instead of white, just because I felt like it. Be sure to check out the Tuesdays with Dorie blogroll to see what variations everyone else has come up with.

I made a half recipe of the lemon curd from Gourmet Today, edited by Ruth Reichl. I chose this lemon curd because it called for whole eggs, but it's a bit pale for that same reason. Tasty enough, though. Here's the recipe:
1 tablespoon finely grated lemon zest
1 cup fresh lemon juice (about 4 lemons)
1 cup sugar
6 large eggs
⅛ teaspoon salt
12 tablespoons (1½ sticks ) unsalted butter, cut in cubes
Whisk zest, juice, sugar, eggs and salt together in a heavy saucepan and add butter. Cook over moderately low heat, whisking constantly, until it's thick enough that the whisk leaves visible trails and it just starts to boil, 6 to 8 minutes.
Pour through a fine mesh sieve into a bowl, covering surface with wax or parchment paper, and refrigerate.

Monday, March 1, 2010

After the Challenge: Caribou Marsala

After I made the tiramisu, I had some leftover mascarpone that I certainly didn't want to throw away. I also had some caribou chops in the freezer, courtesy of Uncle Ron and his hunting trip to Labrador. I didn't want them languishing in the freezer for a month while I was away, so I decided on a caribou marsala. This has to count as one of my wisest decisions ever. It was lick-your-plate delicious and I can't wait to make it again.


I made the sauce by searing the caribou in a hot pan, removing it and cooking some chopped shallots. I added marsala, reduced it, and then added some reduced beef stock. To finish, I swirled in some butter and garnished it with a bit of chopped parsley. Make this sauce! It's old-school, but delicious. 

On the side I served polenta with mascarpone, Parmesan and black garlic. Black garlic? I've been seeing lots of blogs about this stuff, so when I saw it on sale at my local grocery store I picked some up. It's got a funky smell, but a mild flavour, and the texture is a bit like that of roasted garlic: soft and sticky. I don't believe the miracle properties ascribed to this stuff, but it's an interesting ingredient, and certainly a dramatic-looking one. Oh, and roasted Brussels sprouts. I love Brussels sprouts:)


The black garlic.