I hope everyone had a wonderful Christmas, if that's your sort of thing. I have been taking my 2 weeks of vacation very seriously, and have only baked a few pies and a birthday cake. I made this confection above the week before Christmas, and have been wanting to tell you about it, but couldn't find the time in the holiday mayhem. I'm not really sure what to call this, but the texture of the chocolate part was fudgy, with crispy edges, and the pistachio marzipan was rich and delicately flavoured. Together, they were outstanding, and I'm not even a chocolate fanatic.
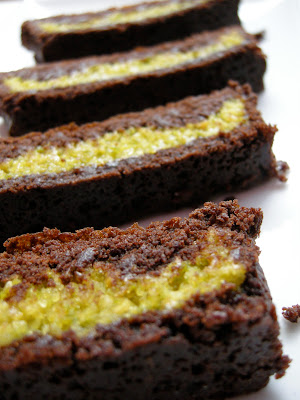
I adapted this recipe from the gevulde speculaas, or spice cake with almond paste I made last month, by substituting Dutch-processed cocoa for some of the flour and making a sweetened pistachio paste from the fabulous, fresh Iranian pistachios available just down the street. I omitted the spices, but I bet a chocolate spice version would be fantastic. I baked it in a rectangular tart pan, but a round cake pan would also work well. Blanching and peeling the pistachios was a time-consuming business, but the end result was so worth it. Umm, that's a lot of 'buts', but I can't think of any other words right now. Bear with me. The brownies kept well in a covered container for well over a week, though I cut a small slice every time I walked by. Pistachio marzipan brownies
Adapted from Warm Bread and Honey Cake
1⅓ cups all-purpose flour
⅓ cup Dutch-process cocoa
½ teaspoon baking powder
¼ teaspoon salt
7 oz/1 cup brown sugar
6 oz/¾ cup unsalted butter, chilled and cubed
1 egg, well beaten
Filling
10½ oz pistachio marzipan (I made my own, see below)
about ½-¾ of a beaten egg (reserve the rest for glazing)
- Combine flour, cocoa, baking powder, salt and sugar in a food processor and pulse to combine. Add the butter and pulse until it resembles breadcrumbs. Add the beaten egg and run the food processor until the dough comes together. Try not to eat all the dough. Divide the dough into ⅓ and ⅔ portions, shape in discs, wrap separately in plastic and refrigerate. Chill for one hour. It can be made the day before, but will need to warm up before rolling to prevent it from breaking up.
- Preheat oven to 340℉/170℃ and grease a 9" cake pan, or a 13"x4" tart pan.
- Mix the pistachio paste with enough beaten egg to make a fairly soft, spreadable filling. Set aside. Roll out the larger portion of dough between 2 pieces of plastic wrap until it is about 1" larger than your pan on all sides. Make sure there are no creases in the plastic wrap. Use this piece of dough to line the pan, pressing it to the sides of the pan so it doesn't fall inward. Spread the pistachio paste evenly over the dough and fold in the dough edges so they rest on it. Reuse the plastic wrap to roll the smaller piece of dough into an 8½" circle. It should be slightly smaller than the cake pan. Trim it so the edges are neat. Moisten the edges of the dough in the pan and lay the smaller circle on top. Press the edges gently together to seal. Brush with the leftover beaten egg and prick with a fork in several places.
- Bake for 30-35 minutes. Leave to cool in the pan, then transfer carefully to a serving plate. If you can stand it, wrap this and let it sit for a day or two before serving for best flavour.

Pistachio marzipan
10 ounces/283 grams shelled pistachios
7 ounces/200 grams granulated sugar
2 egg whites
This was rather labour-intensive, so if you can find shelled, blanched pistachios, it'll be worth it. Otherwise, pick up about twice the weight of pistachios in the shell.
- Bring a large pot of water to a boil, add pistachios and blanch for 30 seconds to one minute. Test one by running it under cold water and seeing if the reddish skin comes off easily. If so, drain and rinse with cold water. Now, one by one, squeeze the pistachios to remove the skin. This is what keeps the marzipan bright green. Once they are all skinned, place on a towel-lined baking tray and allow to dry for at least 3 hours. Do not dry in the oven, as the colour may fade.
- Combine pistachios and sugar in a food processor and grind as finely as desired. I leave mine with a bit of texture.
- Add egg whites and process until well blended. Scrape into a container and refrigerate or freeze. This keeps well, and is best made in advance.
 |
| Clockwise from top: pistachios in shell, shelled, blanched, marzipan |
Oh, and here's the last slice of my mother's birthday cake: one for the baker!


