Showing posts with label caramel. Show all posts

Thursday, September 1, 2011

Coconut Ice Cream with Passionfruit Caramel


Remember those passionfruit caramel filled chocolates from my last post? They might have been a bit of a disaster, but the very happy outcome was that I got a great recipe for passionfruit caramel sauce. Not that this sauce was immune to the struggles I had that day. The recipe stated 'dark amber caramel' and I thought my caramel was amber but the end result was much too thin and pale. I used golden syrup instead of corn syrup, giving it a darker colour to start with, so this may have been the problem. However, golden syrup has so much more flavour than corn syrup, so it was worth having to boil the caramel for another 10 or 15 minutes after adding all the ingredients. It still wasn't thick enough at room temperature. Oh well. It was so delicious that I was really happy to have almost 500 ml left after making the chocolates. Even though I tested it almost every day, there was still enough left to do something with. I decided to make ice cream and stuck with tropical flavours to make a knockout combination. This is a simple and tasty ice cream, but it makes a very small batch. 2 cups was perfect for me, but you may want to double it.

Coconut Saffron Ice Cream
Source: Delicious Days by Nicole Stich, via David Lebovitz
1 cup coconut milk
⅔ cup whipping/heavy cream
¼ cup sugar
scant ½ teaspoon saffron threads
  1. Combine all ingredients in a saucepan and bring to a boil.
  2. Reduce heat and simmer for 10 minutes, stirring occasionally. Transfer to a small bowl and chill thoroughly.
  3. Churn in an ice cream machine, transfer to a sealable container and place in the freezer to firm up. 

Passionfruit Caramel Sauce
Source: Adapted from CandyBarLab by Lisa of Parsley, Sage, Desserts and Line Drives
Makes 3+ cups!

¾ cup + 2 Tablespoon (210 ml/7 oz/200 gm) passion fruit puree
1½ cups (360 ml/12 oz/340 gm) sugar
½ cup + 2 Tablespoon (180 ml/5 oz/140 gm) corn syrup (I used golden syrup--yum)
1¾ cups (420 ml) whipping/heavy cream
6 tablespoons (90 ml/3 oz/90 gm) unsalted butter


  1. Place the sugar, golden syrup and enough water so it’s like wet sand in a medium saucepan. Set over medium-high heat and stir to combine. Bring the mixture to a boil and cook until dark amber in color, about 5 minutes. Use a pastry brush, dipped in water, to wash down sides of pan to prevent crystallization as the mixture boils. Remove saucepan from the heat and gradually whisk in the passion fruit puree, heavy cream and butter. Transfer to a medium bowl and let cool.
  2. Serve warm or at room temperature with just about anything you can think of! I found this caramel sauce had a greasy mouthfeel when refrigerated, so I may skip the butter next time, and there will be a next time.


Saturday, August 27, 2011

The Daring Bakers Go Candy Crazy!

Greetings from Ecuador! By the time this is posted I will have been here for a week or so. I am working on a course training English teachers, and living in a very rustic setting on a Pacific Coast beach. I have heard that internet access (and electricity) can be intermittent, so I have scheduled posts for the next 6 weeks, and I'll check in as often as I can and post pictures if possible.
Update! My laptop's hard drive crashed and died the day after I arrived! Some of the posts I had scheduled, but hadn't attached the pictures yet, so I've postponed those till I get back and get a new computer. Sp now I will post about once a week, but will be back in October. Ecuador is gorgeous, by the way, and the food, especially the fruit, is amazing.
Dark chocolates with passionfruit caramel filling
This month's Daring Bakers' challenge was fantastic because it didn't require me to turn on the oven. This month's Daring Bakers' challenge was not fantastic because tempering chocolate was required. I'm sure I've whined about this before in this space, but I am not a big fan of chocolate. There's something about the texture I don't like and I'm not crazy about the flavour either, but I do like chocolate cake and other baked goods more than plain chocolate. And yes, I've had the good stuff! However, I do like a challenge, so I jumped in as soon as I had a free day. Unfortunately that free day was one where the temperature was higher than the temperature I had to bring the melted chocolate down too, causing me no end of trouble.
My sweaty chocolates after their sojourn in the freezer
First of all, I had a hard time finding a chocolate thermometer. I called a local cake decorating supply store and they assured me that they had one for the bargain price of $6.95. I drove through heavy traffic to discover that it wasn't a chocolate tempering thermometer and didn't go as low as I needed. After coming home and making a number of calls I found a store in the other direction that did have one. I got it, but it only has Fahrenheit on it, and I am hopeless with Fahrenheit. I can barely spell it, in fact. 
I chose a heavy glass bowl to melt the chocolate in, and I think this was the wrong choice for the season. It held the heat forever and meant the chocolate did not cool down. I couldn't remember the temperature range and kept running to the living room to check my laptop. Even though I am very patient, I ended up sticking it in the freezer at one point. In the end, I did get it tempered, but then I had to fill the *^*%&^ molds! I lined them with chocolate, then overfilled them with the delicious, but too thin, passionfruit caramel (more on that in my next post), meaning it was impossible to get a nice thin, even base on them. I ended up with a thick layer of chocolate on the bottom and all the chocolates joined together. I did not foresee the trouble that was to come. Can you? When I went to unmold the chocolates, the base snapped off most of them and the filling ran everywhere. Out of 26 chocolates only about 6 survived. The rest? Garbage! I went to mope on the sofa in frustration and discovered that I had obviously stepped in some melted chocolate and left chocolate footprints all over the apartment. Sigh. And I was only half finished the challenge...
Luckily for me and my floors, the next part of the challenge was a non-chocolate candy. Yay! There were so many things I wanted to try, but I picked up a basket of Coronation grapes one day, and while I was eating them and admiring their tart, concentrated flavour, I decided to make pâte de fruit with them to see if I could capture that essence in a candy. The answer is a resounding yes! Coronation grapes are the Canadian cousin to Concord grapes and they are in the markets and grocery stores in Ontario right now. They are dark purple-blue, thin skinned, tart, seedless and with a strong taste. This is the first time I have done anything with them other than eating them out of hand, as I can easily finish a basket in a day. These were perfect little bites: tart, with a great texture and the coating of sugar was a great and necessary contrast. I used this recipe. Pâte de fruit has a reputation for being tricky, but I had no troubles with this one, and in fact sat in the living room with a friend, chatting, and only occasionally stirring the boiling mixture. I am much better at that than being focused and precise!
Thanks to Lisa and Mandy for a fantastically challenging challenge! You can find the entire text of the challenge, along with photos, links and recipes here. Please check out the slideshow of the amazing creations by candy makers more daring than me! I'll miss the next Daring Bakers' challenge, but will be back for October. Cheers!

The August 2011 Daring Bakers’ Challenge was hosted by Lisa of Parsley, Sage, Desserts and Line Drive and Mandy of What the Fruitcake?!. These two sugar mavens challenged us to make sinfully delicious candies! This was a special challenge for the Daring Bakers because the good folks athttp://www.chocoley.com offered an amazing prize for the winner of the most creative and delicious candy!


Tuesday, January 11, 2011

Cardamom crème caramel

Simple, sweet and soothing, this is like a favourite childhood dessert, though not one from my childhood. We were more likely to have baked rice pudding or stovetop tapioca pudding, both of which I also love. This is my first foray into baking after yet another illness. It seems that I have caught every bug going around this winter. I visit many elementary schools, so I have plenty of opportunities to pick up germs, but this is getting ridiculous. This time it was a fever that stole my entire weekend, keeping me in bed for all but a few hours over 3 days. Once I woke up and started eating again I ate toast and tea, along with rice and orange juice. French toast was the next step, and today, I decided that I was ready for some dessert. Tomorrow it's back to germ warfare, sadly.
This recipe is from a wonderful book called My Bombay Kitchen, by Niloufer Ichaporia King. All the recipes sound delicious, but I haven't gotten any further than the desserts chapter. It might as well be called the cardamom chapter, as it is full of amazing-sounding sweets, spiced with that fragrant green pod. More on those other recipes later, but now I think you need to get yourself into the kitchen to make this. I used egg yolks rather than whole eggs, giving me a silky, pale yellow custard with the sharp flavour of very fresh cardamom. Don't even think about using pre-ground cardamom: you won't get any appreciable flavour from it.

Cardamom caramel custard
From My Bombay Kitchen, by Niloufer Ichaporia King
⅓ cup plus ½ cup sugar
2 cups half-and-half (I used some half-and-half and some milk)
1½ teaspoons cardamom seeds, pounded in a mortar (measure the sticky black seeds, not the green pods)
4 large eggs (I used 5 yolks and 1 egg)
pinch of salt
  1. Combine ⅓ cup of the sugar, the half-and-half, and the cardamom in a saucepan. Bring to a boil; remove from the heat and set aside for at least an hour to let the cardamom flavour develop. 
  2. To make the caramel: over medium heat, stir together the remaining ½ cup sugar in a small heavy saucepan with 2 tablespoons water until it melts. Keep stirring until it darkens to dark brown (I don't like my caramel that dark, so pull it off the heat when it's a dark amber). Add a splash of water and quickly pour into a 4-cup baking dish, or into 6 small (½ cup) ramekins. Set them aside until you're ready to make the custard.
  3. Preheat the oven to 350℉. (I went with 300℉, as I prefer a lower temperature for baked custards)
  4. Lightly beat the eggs with the salt, and continue whisking as you pour in the cardamom-infused cream. Strain it into the caramel-lined dish.
  5. Set the baking dish or ramekins into a larger baking dish. Pour in enough hot water to come halfway up the sides of the dish. Bake in the middle of the oven for about 35 minutes, until a knife inserted an inch from the centre still looks wet. The custard will thicken and firm up as it cools. Remove from the water bath.
  6. Cool to room temperature and then chill thoroughly, several hours or overnight. The longer you chill it, the more the caramel will melt into a sauce. Run a knife around the custard and turn it out onto a deep plate.

Thursday, November 11, 2010

Caramel-topped semolina pudding

What is the difference between semolina and farina? This has been one of the burning questions this month on the French Fridays with Dorie website. Now, I tried to help, but I'm really not sure half the time. I sometimes buy semolina to make pasta (okay, I did once about 10 years ago), but is it fine or coarse? Is it durum semolina? How about I just skip the recipe and make something else on my very long to-do list? Um, please don't go to Wikipedia and tell me what they think. :)
I wasn't sure when I saw the title of this recipe, but you need to read on with Dorie recipes, because the title may actually tell you very little about it. It may even mislead you completely. This dessert is called a semolina cake, but contains no semolina and is not even slightly cake-like. Hmmm. What it did have, though, was an ingredient I was familiar with: Cream of Wheat. I even had some in my cupboard, so I got right to it.
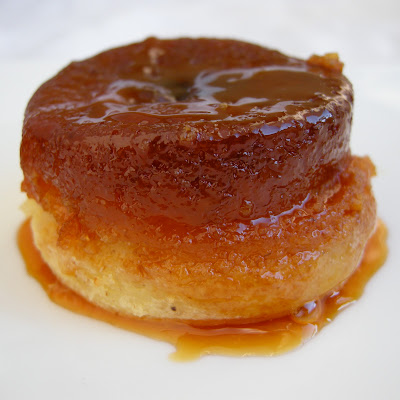
We have been asked not to publish the recipes from this book, but for this pudding you hardly need one. Make cream of wheat as usual, with milk. Add sugar, flavouring and beaten eggs. Pour into a caramel-lined cake pan and bake till it puffs up. Invert, cool, and serve. I did not include the raisins, as my raisin aversion has been well documented here. I used my own vanilla spice extract, which is in a rum base. I also made half the pudding recipe but the full amount of caramel and divided it amongst 3 small ramekins. I could have made 4, as I didn't realize it would puff so much. in fact, mine were like little volcanos in the oven, spouting molten caramel. This is why the oven window is better than TV. Come back on Sunday for some photographic evidence of that.
I really liked it, and didn't find it resembled my winter breakfasts much. It was firm enough to turn out, but soft enough to eat with a spoon. The flavours of rum, vanilla, mace, tonka bean and sapote were understated, but definitely there. I didn't think it needed anything to accompany it, though apparently it's good with pineapple. Perhaps grilled? Even though I doubled the caramel, there wasn't a lot. Usually a custard is baked long and slow in a water bath, then chilled overnight, making lots of runny caramel. This caramel was still quite sticky, and I was able to spin it into all sorts of shapes as I ate it. I refrigerated one overnight to see if it had more, but it didn't--the pudding seems to absorb much of it. Also, the pudding was firmer and not as nice the next day. So, make it and eat it--neither will take long!
Some see the world through rose-coloured glasses--I prefer caramel.
See you Sunday with the Daring Cooks' reveal!

Monday, October 18, 2010

TWD: Caramel pumpkin pie


This week's recipe came a week after Canadian Thanksgiving so the smart and efficient thing to do would have been to make it a week in advance and serve it at the family dinner. I didn't do that, not only because I rarely choose the efficient way, but because I was worried that it wouldn't be as good as my regular recipe. I make a good pumpkin pie, if I do say so myself (I guess I just did). Anyway, I didn't even get my own pie made this year for the holiday, as it was a busy weekend. Instead, I melted my pumpkin ice cream down and used that as pie filling the next day. It was amazing--custardy and bright orange, just the way I like it! So good, that my mother called to see if I had told my sister-in-law I had also left some behind for her. She wanted to keep it all to herself. Luckily I hadn't said anything and my mother got 2 her pieces of pie. If you want to use that recipe you don't need to freeze it first, obviously. I'm all about efficiency, you know.
What does all that have to do with this week's recipe? Not much. I decided to make this pie in ramekins rather than in a crust for a change. I also decided to switch up the flavouring, as I find pumpkin pie sometimes just tastes of the spices rather than of the pumpkin. So, out came my favourite homemade essence: extrait antillais. I know I have mentioned it a number of times, but it's vanilla beans, tonka beans, sapote and mace marinated in rum. I sometimes use this to replace rum and vanilla and that's what I did here. Forgetting that I wanted to go light on spice, I added small amounts of fresh mace, nutmeg, sapote and tonka bean. Unfortunately, the spices completely overpowered the pumpkin and I found it inedible. I ate 2 to be sure. I guess the extrait has been sitting long enough that it's really powerful. Anyway, they looked pretty enough, but this recipe won't be replacing my regular one, as the texture wasn't as nice. And the colour! The caramel was delicious, but it darkened the filling enough that it looked like canned. Eeek! I know I ranted about this when I made the ice cream, so I won't do it again, but just look at this:

This week's recipe was chosen by Janell of Mortensen Family Memoirs. Great pick, and sorry I screwed up! As always, head on over to the TWD site to see what everyone else baked up. Should be good--lots of positive comments this week. Some pumpkin-haters may even have become pumpkin eaters. :)

Update: Hmm, just had a friend over for dinner and I let her try the reject pumpkin pie. She took them all home, so maybe they're not as bad as I thought. She's going to mix them with ice cream to tone down the spice a bit.
Another entry for Torview's Orange recipe month!

Thursday, May 27, 2010

Daring Bakers: Pièce Montée (Croquembouche)

I was so excited when this challenge was revealed: cream puffs were a favourite childhood treat for my brother and I. No trip to Cantor's Bakery was complete without a giant cream puff. I have made them and éclairs, and even a Gâteau St-Honoré, but I had never assembled a croquembouche. It was tempting to jump in right away, as I had all the ingredients on hand, but I decided to wait and make it for my birthday. Of course, this also meant I could procrastinate a bit, which is always appreciated. 
One of the best things about this dessert is that it doesn't include chocolate! I decided to fill the puffs with vanilla pastry cream and passion fruit curd. For the glue, I used caramel. I wanted to make some spun sugar, but the day was a bit grey and drizzly, so I skipped it, though my first batch of caramel did spontaneously turn into spun sugar. I didn't have time at that point, as I didn't want to be late for my own brunch.
The pâte à choux was really easy to work with, and I got 35 puffs from the recipe given. I used about 30 to make the croquembouche, as that's all I could fill using the 2 batches of filling I made. I used the challenge recipe for the vanilla pastry cream, and the recipe for the passion fruit curd comes from Heavenly Cakes, by Rose Levy Berenbaum. The vanilla pastry cream was the perfect texture, but the passion fruit curd was runny, which made for some messy eating. You can find the recipe for this, as well as the rest of the challenge recipes at the end of the post.
I dipped the filled puffs in the molten caramel by hand, burning myself a number of times. Only one blister, though, which is not too bad, considering I dipped them top and bottom. It was quite easy to build the structure, as the caramel was like super glue. The croquembouche sat for a few hours while we ate our brunch, and the caramel got a bit too chewy in the humidity, but it was still delicious. I'll definitely be making this one again! Check out our host Cat's site here, and see the slideshow of creations from the Daring Bakers here.


Blog-checking lines: The May 2010 Daring Bakers’ challenge was hosted by Cat of Little Miss Cupcake. Cat challenged everyone to make a piece montée, or croquembouche, based on recipes from Peter Kump’s Baking School in Manhattan and Nick Malgieri.


Recipes after the jump!

Tuesday, May 4, 2010

TWD: Burnt sugar ice cream (sandwiches)


I usually only eat ice cream a couple of times a year, when I'm visiting Toronto. That's the home of Greg's, where you can find fabulous flavours such as cardamom, roasted marshmallow, and sweet cream. Sweet cream is my favourite: it's so fresh-tasting, and is like vanilla without the vanilla. Anyway, even though I'm not a big ice cream fan, I was excited about this recipe. I have an ice cream maker I bought when I was a teenager (I was weird like that), and I haven't used it since I moved away from Toronto in 2006. In fact, I've probably only used it a dozen times in all the years I've had it. The last ice cream I made was corn, with the freshest corn from my aunt and uncle's farm. And, yes, it was delicious.

This ice cream was simple in flavour, with no Dorie mix-ins, which I really liked. It was just sugar, caramelized, eggs yolks, milk, cream and vanilla. The custard tasted fantastic, with a slightly bitter undertone from the burnt sugar, so I knew the ice cream would be good. I decided to sandwich it in between some graham crackers, mostly because I loved the graham crackers I made in January, and was looking for a reason to make them again. They have a slight burnt sugar taste of their own, from all the honey and brown sugar, so I thought they'd go nicely together. Oh, and while I may never go for a bowl of ice cream at home, I can't resist those cheap ice cream sandwiches. There's always a box in the freezer at my brother's, at least when I get there, if not when I leave.

This week's pick was chosen by Becky of Project Domestication, so she'll have the recipe for the ice cream posted. You can find the graham cracker recipe here. I wouldn't advise using the pastry flour, as the dough is soft and sticky with all-purpose. Oh, and they certainly don't take 25 minutes to bake in my oven. 10-15 is more like it, especially as I didn't want them too crisp.

UPDATE: The graham crackers got a bit soft and cakey after being in the freezer overnight--perfect! Oh, and how did I make them? After churning the ice cream, I froze some of it in a shallow pan lined with plastic wrap. I used the same cutters to cut the ice cream, then I just sandwiched it between 2 frozen graham crackers and wrapped them with some waxed paper and origami paper. I froze them between each step, but this ice cream melts really quickly, and it was a warm day. They were at their best after at least 24 hours in the freezer, as they were impossible to eat before the crackers softened a bit. Once they did, though, they were perfect--very caramelly!

Saturday, March 27, 2010

Daring Bakers' March Challenge: Orange Tian


Tian? What? It certainly sounds fancy, doesn't it? A tian is a layered dish, either sweet or savoury. The required components for this month's challenge were:
  • the pastry base (pâte sablée)
  • the orange marmalade
  • the whipped cream
  • the citrus segments
  • and a caramel sauce 
I was excited about making marmalade, as I have made all sorts of preserves before, but never marmalade. I got so excited that I made about 3 litres of the stuff, or 14 jars! I used a tablespoon in the tian recipe, so there are leftovers. Want some? I've been eating it instead of ginger honey on my toast, but considering I don't eat much toast, it could last a while. I made it with Seville oranges, and it was delicious, but there was definitely a bitter undertone.  The colour was beautiful, so I may just hang a jar in my window as a suncatcher. Except I don't get much sun in my apartment. This photo was taken at my mother's--she gets lots of sun.

I really spaced out the components of this challenge. About a week after the marmalade I made the caramel and segmented the oranges (navel and blood) and grapefruit as they had to sit overnight in the caramel. The next day I made the pâte sablée and realized I had no whipping cream to make the filling. So, the citrus got an extra day in the caramel. At least some of it did--it was pretty tasty.

The next day it rained and was completely grey outside, so I postponed again. My north-facing apartment gets little enough light as it is, and I couldn't get enough to photograph anything in natural light. Of course I haven't got lights--I'm using a point and shoot camera! So, I just ate a bit more of the fruit and hoped I'd have enough to put the dessert together.

Once I finally remembered to pick up the whipping cream and the weather cleared up it came together really quickly. The recipe called for stabilizing the cream with gelatin, but since I was only making 2 small tians I didn't think this was necessary. I had read in Rose's Heavenly Cakes that dulce de leche could be used to sweeten and stabilize whipped cream, so I did that, as I thought that it would be nice with the caramel sauce, and it was. I already knew that dulce de leche went very nicely with the pastry, as I had made cookies out of the leftover pastry, sandwiched them together with dulce de leche and used them for Tuesdays with Dorie just a day earlier. Recycling is in, people!

These were delicious! The crisp and buttery pâte sablée base with the caramel whipped cream, fresh citrus and more caramel sauce made for a great combination. I used Seville orange juice in the caramel sauce, so it was not very sweet. The marmalade in the cream was a nice surprise too. Well, not really a surprise, since I had just made it, but I was still somewhat surprised to find it there. Not paying attention can have its benefits!

Mandatory blog-checking lines: The 2010 March Daring Baker’s challenge was hosted by Jennifer of Chocolate Shavings. She chose Orange Tian as the challenge for this month, a dessert based on a recipe from Alain Ducasse’s Cooking School in Paris. 

Thanks Jennifer for a great challenge! Check out the slideshow to see what all the rest of the fabulous Daring Bakers have come up with this month.
:)

Recipes after the jump.


Tuesday, February 2, 2010

TWD: Milk chocolate mini (not) bundt cakes


Cake is my favourite dessert, so I was so happy that we finally had one to make this week. In fact, I baked 2 weeks' worth of Dorie along with the apple turnovers on Friday. I am going to Montreal for a month's work, so this was my only sure opportunity to bake.
It seems whenever I make one of Dorie's recipes I leave things out. I've never thought of myself of a minimalist, and if you could see the state of my apartment I'm sure you'd agree. Anyway, I left the following out of this recipe:
1. The swirl--I didn't want this to be like coffee cake.
2. The chocolate glaze--seems many of my fellow bakers had trouble with it. I did replace it, though.
3. The holes. I don't own a mini bundt pan.
That's not too many omissions, is it?
I realized I don't even own a muffin tin, as I gave it away a few weeks ago. I do have some 4-ounce ramekins and the batter was the perfect amount to make 8 small cakes.
These weren't bad, but I wish I had replaced the milk chocolate with dark, because I didn't find that they had enough chocolate flavour. They were really good warm with the caramel sauce and a few toasted pecans.

Oh, the caramel sauce: Mmmmmm! I had half a can of condensed milk left in the fridge from these, so I cooked it with about 3/4 of a cup of dark brown sugar, stirring until the sugar melted and then added around 1/2 a cup of half and half and a few tablespoons of butter and simmered until it was thick. After cooling slightly, I added some vanilla. 
This week's recipe was selected by Kristin of I'm Right About Everything, so click on over to her blog for the recipe. You can also see what everyone else came up with by checking out the TWD blogroll.

Tuesday, January 5, 2010

Tuesdays with Dorie: Tarte Tatin

I have joined the Tuesdays with Dorie baking group just in time for their second anniversary. To join this group you need to have:

a) a blog
b) Baking: from my home to yours, by Dorie Greenspan

Well, I have the cookbook (of course, my friends and family are saying), and now I have Mary Mary Culinary too! The rules of the group are simple: each week, one of the bakers on the blogroll selects a recipe, and we all bake it and post on Tuesday. I'm not sure if I'll be able to bake every week, and will have to sit out if there are raisins involved, but I'm excited. I've had this book since it came out and only tried a few recipes, so only 297 or so to go.

This week was hosted by Laurie over at slush and the Tarte Tatin recipe was one of two that the group members voted to make for the anniversary.  The other was the cocoa-buttermilk birthday cake, but I made that for my sister-in-law's birthday in December, so Tarte Tatin it was. Glad I got to make the one I voted for. :) I made my own puff pastry on Sunday and made the tarte for dessert tonight.

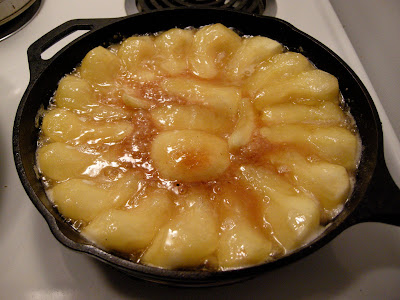
I started by caramelizing the apples in butter and sugar. It took a long time--about 10 minutes after I took this picture. I wanted the caramel good and dark.


Guess I forgot to take any pictures of my lovely puff pastry, but here's the finished tarte! You can also see the partially eaten tourtière (French-Canadian meat pie) in the background. It was a 'keep your fork, there's pie' sort of dinner.


It was pretty yummy with some crème fraiche.


Who knows what next Tuesday will bring?